Hardware
OpenSight primarily targets the Raspberry Pi, however, it can be run on numerous different setups. OpenSight supports all cameras. If you have any compatibility issues with any coprocessor or camera, come to our Discord.
Hardware Configurations
The Raspberry Pi (and other coprocessors) require 5V, so if you are using OpenSight on a robot, you will need to step down from 12V to 5V. All configurations include an appropriate step down module.
Here are some recommended configurations at different price points. Each configuration inculdes a either typical or estimated performance. Any configurations with an estimated performance will be marked with a *. If you have any of these configurations and want to submit performance figures, we would greatly appreciate it!
Most product links are Amazon links for consistency, however many of these parts can be found cheaper from their manufactuer or other websites.
Warning
Please note that we have not tested all of these items. We are not specifically recommending any of these products. We are not liable for any non-working configurations or for any damage you do to any components.
OscarEye
Raspberry Pi 4 85 FPS @ 320x240
| Item | Link | Price |
|---|---|---|
| Raspberry Pi 4 (1GB RAM) | https://amazon.com/dp/B07TD43PDZ | $41.99 |
| Raspberry Pi 4 Case | https://amazon.com/dp/B07W3ZMVP1 | $8.99 |
| Arducam 5 | https://amazon.com/dp/B012V1HEP4 | $12.99 |
| 16GB MicroSD Card | https://amazon.com/dp/B073K14CVB | $5.79 |
| HOMREE DC 12V to DC 5V (USB-C) | https://amazon.com/dp/B07ZQB6S3L | $10.90 |
| Total | $80.66 |
General Setup
To connect any coprocessor to the robot, you will need an Ethernet cable. Plug the Ethernet cable into the extra port on the radio to connect your coprocessor to the robot.
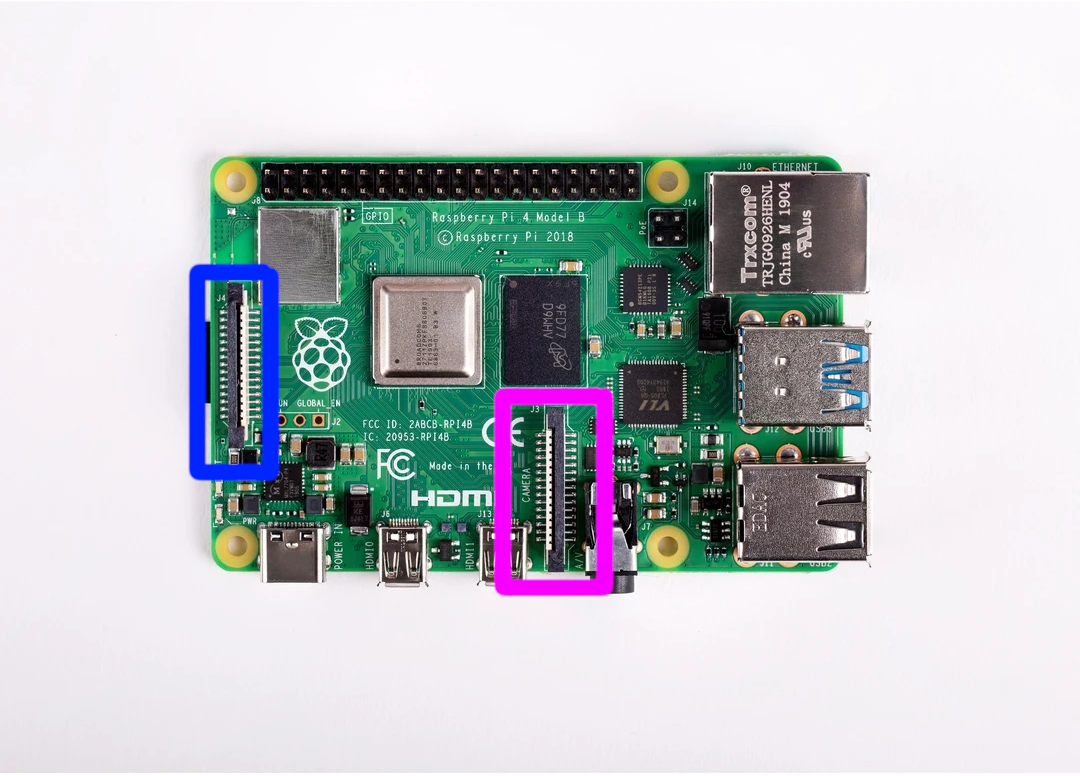
Using a Pi Cam
If you are using a Pi Cam (such as the Arducam 5) you will need to connect your Pi Cam to the port boxed in PURPLE on the image. Do not connect it to the port boxed in BLUE on the image.
LEDs
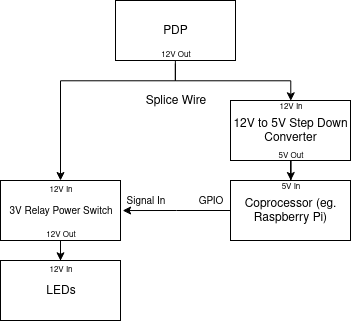
You can control LEDs either directly from the robot using the PCM, or by using GPIO (GPIO module coming soon).
PCM
If you want to use PCM, make sure your PCM is running 12V, not 24V. Once you plug your LEDs into the PCM, you can control them from the Robot Code in the same way you would control a regular solenoid (Java/C++).
GPIO
If you plan on using GPIO, you will need a relay switch of some sort. Keep in mind that the Raspberry Pi's GPIO only outputs 3.3V. Here is a relay switch which has been successfully tested with a Raspberry Pi 4. Also, most LEDs run off of 12V. Here is a diagram of how to properly set up LED control from the Pi. Here is a diagram of how to properly set this up: